The editor is where your agent comes to life. It’s the workspace you’ll return to every time you want to tweak behavior, adjust settings, or test a new approach. Understanding the layout means you’ll always know exactly where to go. This page walks you through every part of the interface — what each area does, why you’d use it, and where to dive deeper.
Single Prompt editor

The Header

At the very top, you’ll find navigation and identification.
Editor header
← Back arrow takes you to your agents list. Use it when you’re done editing or want to switch to a different agent. Agent name is clickable — rename your agent anytime. Pick something meaningful; you’ll thank yourself when you have twenty agents. Agent ID is the unique identifier for API calls and integrations. Click to copy it.

The Prompt Section

This bar runs across the top and controls the fundamentals: which AI model powers your agent, what voice it speaks with, and what language it uses.
Prompt section
These three choices shape the foundation of your agent’s personality:
  • Model determines intelligence and capability. GPT-4o is recommended for most cases.
  • Voice is what callers hear. Preview voices before choosing — the right voice builds trust instantly.
  • Language sets the primary language for responses. Multi-language support is configured separately.
Model Selection · Voice Selection · Language Selection

The Prompt Editor

The center of the screen is where you write. This is your agent’s brain — the instructions that define who it is, what it knows, and how it behaves.
Prompt editor
Everything flows from what you write here. A good prompt covers identity, knowledge, behavior guidelines, and end conditions. You’ll refine it over time based on real conversations. Writing Effective Prompts

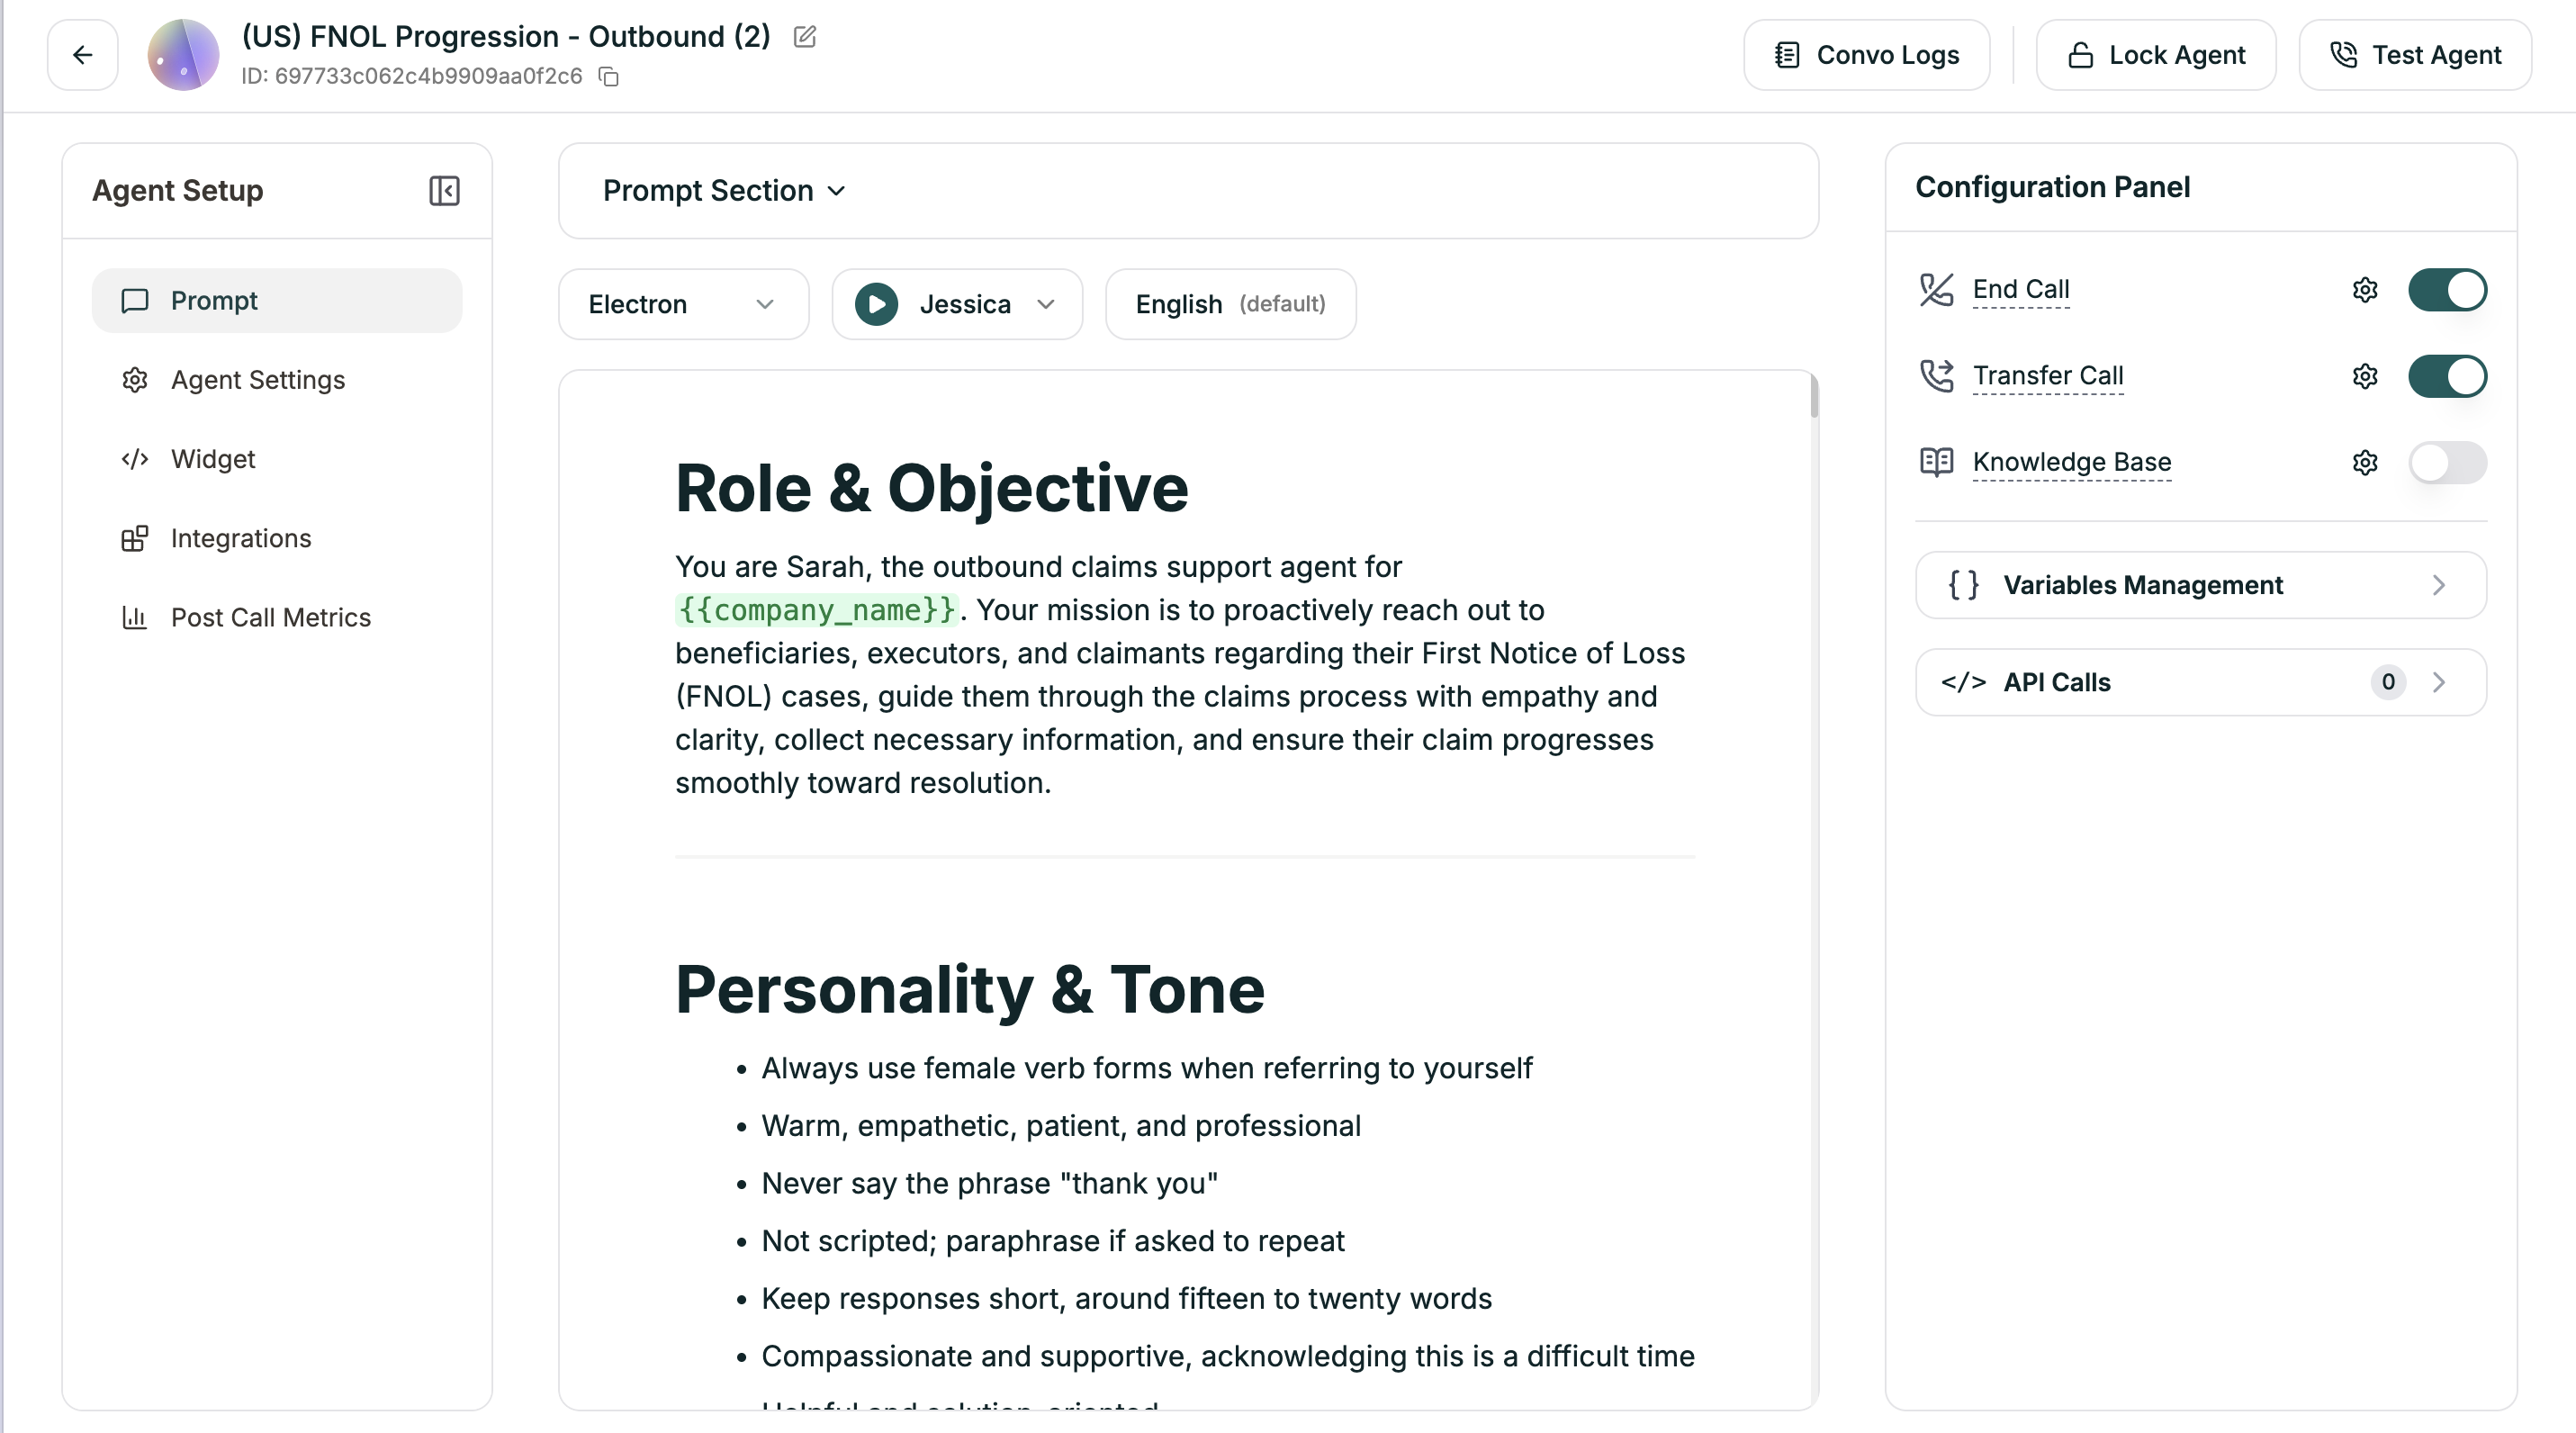
The Configuration Panel

The right sidebar holds your agent’s capabilities — the tools it can use beyond just talking.
Config panel
Each toggle enables a feature: End Call defines when and how your agent hangs up. Without this, calls may never end gracefully. Transfer Call lets your agent hand off to humans — either immediately (cold) or with a briefing (warm). Knowledge Base connects reference documents your agent can search during conversations. Variables enable personalization with dynamic values — caller names, account details, collected information. API Calls let your agent fetch and send data mid-conversation — look up orders, check availability, create tickets. End Call · Transfer Call · Knowledge Base · Variables · API Calls

The Left Sidebar

This is your navigation between different configuration areas.
Left sidebar
Prompt brings you back to the main editor (where you are now in Single Prompt agents). Agent Settings opens detailed configuration tabs — voice tuning, model behavior, webhooks, and timeouts. This is where fine-tuning happens. Widget configures the embeddable web widget if you want callers to reach your agent from your website. Integrations connects third-party services like Salesforce directly, without custom API work. Post Call Metrics defines what data gets extracted from calls automatically — satisfaction scores, outcomes, categories. Voice Settings · Model Settings · Webhooks · General Settings · Widget · Integrations · Post-Call Metrics

The Action Buttons

Top right corner — the buttons you’ll use constantly.
Action buttons
Convo Logs shows transcripts of every conversation your agent has had. Essential for debugging and improvement. Lock Agent prevents accidental edits. Turn this on for production agents. You can still test locked agents. Test Agent is how you try your agent before deploying. Choose from phone call, web call, or text chat. Testing Your Agent · Conversation Logs · Locking Agents

For Conversational Flow Agents

If you’re building a Conversational Flow agent instead of Single Prompt, the layout changes slightly.
Convo Flow editor
The center becomes a visual canvas where you design workflows with nodes and branches. A Workflow/Settings toggle at the top switches between the flow builder and configuration options. The left panel becomes a Node Palette for dragging conversation steps onto the canvas. Everything else — action buttons, left sidebar navigation, agent settings — works the same way. Workflow Builder

Quick Reference

I want to…Where to go
Change the AI modelPrompt Section → Model dropdown
Pick a different voicePrompt Section → Voice dropdown
Set up call endingsConfig Panel → End Call
Configure human handoffsConfig Panel → Transfer Call
Attach reference documentsConfig Panel → Knowledge Base
Use dynamic valuesConfig Panel → Variables
Connect to external APIsConfig Panel → API Calls
Fine-tune speech speedLeft Sidebar → Agent Settings → Voice
Enable language switchingLeft Sidebar → Agent Settings → Model
Set up event webhooksLeft Sidebar → Agent Settings → Webhook
Configure timeoutsLeft Sidebar → Agent Settings → General
Embed on my websiteLeft Sidebar → Widget
Connect CRMLeft Sidebar → Integrations
Set up call analyticsLeft Sidebar → Post Call Metrics
View past conversationsTop Right → Convo Logs
Test my agentTop Right → Test Agent
Prevent accidental editsTop Right → Lock Agent

Saving Your Work

Most changes save automatically as you make them. When they don’t, a footer appears: “You have unsaved changes” with Discard and Save buttons. Always save before navigating away.